Image Map

30 January 2016

Valentine, I've got my eyes on you!

Happy Saturday, friends! I spent the morning at swimming lessons with my little, had lunch with my bestest teaching friend in the entire world, and then picked up my grocery order on the way. Have a I mentioned how grateful I am for Walmart's online grocery ordering and pickup? Such a time-saver! We are supposed to get some serious snow (finally!) here in Colorado Springs, so we had to make sure and get our milk and bread!

After I got home, I decided to go ahead and make up my 3-year old's valentines for her pre-k class. I found these adorable heart-shaped sunglasses at Target about a month ago. It was a pack of 12 for $3. I just knew I could think of something fun to do with them!


Aren't they just the cutest??? They came in blue, pink, yellow, and red. Another reason I liked them is because I didn't have to worry about allergies! (Oh! And they were easily attached to the card stock with washi tape.)


I made the valentine itself in Powerpoint. The chevron border was made just by inserting a shape (chevron), copying and pasting it a few times, matching the color to the heart using the color dropper, and then aligning it horizontally. Trust me...it's really easy! 


The large font is KG Summer Sunshine, and the smaller font is KG Thinking Out Loud. I matched the fonts using the font pairing guide on Kimberly Geswein's blog. It's such a helpful tool! The adorable heart was part of a free clip art set called Scrappy Hearts from Graphics from the Pond on Teachers Pay Teacher. You can download it for free by clicking on the image below!


And how about the final product??? I am in love with it! I just know the other kiddos will have some serious fun with these little sunglasses!


You can download a copy of the valentine off of my Google Drive by clicking HERE. I also added an editable version HERE. That way, you can add your own name! Hope you enjoy it! Have a great weekend!


29 January 2016

Five for Friday

Happy Friday! I wanted to link up really quick with Doodle Bugs Teaching for Five for Friday and give you a little peek into my week! You can link up by heading over to her blog or clicking on the button below.


So here's a quick look at five highlights from this week...


A while back, Ashley from Teaching in Bronco Country did a great Periscope about the Pets in the Classroom grant program. I went straight over to the website and filled out the application. You actually apply for a specific animal. About a week later, I received our approved grant in the mail. It was that fast! I went this week before a family night event and picked our little hamster up. I did have to pay for 50% of the hamster, which was about $8, but the setup was totally free. They even included coupons for other things you might need. The kids are in love! You should definitely go check it out by clicking on the button below.


You can also visit Ashley's blog and check out her original post about the program by clicking on her button below.


I've mentioned NAEIR a few times before, but I just had to show you all the sticky notes I got in my most recent order. All of these sticky notes cost me $3. And they're normal sized sticky notes! The blue ones are monsters, the green ones are hats, and the pink ones, of course, are flowers. This is only a small part of my order, which also included labels, dry erase boards, tape, and 160 SCENTED Fouhy erasers. Those erasers only cost me $2. TWO BUCKS!!! I'm hoping to do a quick scope from my classroom tomorrow to show more of the stuff I got.

One downside is you have to place a minimum order of $25. The supplies are technically free, and you pay the shipping fees. I order maybe every 3-4 months, so it's pretty easy for me to come up with at least $25 to meet the minimum.

If you haven't yet, head over to their website and sign up for a free teacher account. You can click HERE to head over now.


Jess from The Whimsical Teacher made a comment on Periscope one night that we should blog about purposeful things...like how to solve teacher problems. And I had a problem...headphone storage!!! My desktop computer headphones simply hang on the monitor. The listening station headphones stay in the station boxes. I just didn't know what to do to store my Chromebook headphones. I literally have no space left in my room. So, I saw this empty spot on the side of a counter, and this idea was born. I used light-weight Command hooks, gallon sized bags, and mini-binder clips. The binder clip is strategically placed at the edge of the bag so it doesn't interfere with opening the bag, and the kids don't have to take it off. They simply lift a bag off the hook and go sit down. When they're done, they place the headphones back in the bag (no winding cords up), zip it, and hang it on the first open hook. So easy, and I had everything in the classroom to do it. Don't you love it when that happens???


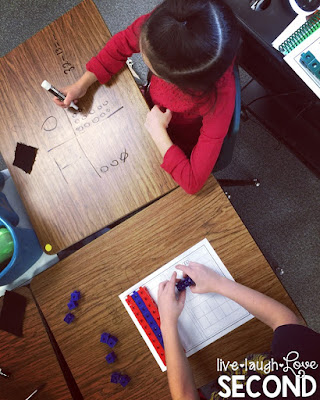
I seem to be mentioning Periscope in the post a lot, but it is where I am gifted the best ideas from some of the best teachers! During Math Motivation Monday on the I Teach TV Network, Angie from Lucky Little Learners shared five strategies for subtraction with regrouping and even shared a great freebie. I wasted no time and used it the next day in my classroom to help some of my kiddos who were having a hard time transitioning from concrete to semi-concrete representation. It work better than I hoped! You should definitely click her button below, and head over to her blog to check out the post she did to accompany her scope.

Lucky Little Learners


My team had to do some adjusting during our intervention time to accommodate a heavy load of fluency kiddos. We have a fantastic online reading program called myON. We knew this would be a great activity for our grade-level and beyond students because they are still reading and completing a comprehension piece every day. While the students usually select which books they read, we have the capability to assigned specific books to each student and monitor their performance on quizzes. We also created a special page they fill out to hold them to an even higher level of accountability.

Since the transition from being in a teacher-led classroom to a self-led classroom was rather quick, we had to ensure the kids could complete purposeful, independent work with minimal disruption to the fluency groups we have. So... the myON Work Group poster was made. We laid out how to get through their assignment from start to finish and even included (most) problems we anticipated. It has worked great so far! I could definitely see making similar posters for my stations during my literacy block!

Well, those were just a few highlights from my week! We are finally supposed to get some serious snow this weekend, and I am ready for it! This is Colorado, after all!

Have a great week!


24 January 2016

Football in the Classroom...and a Giveaway!!!

Happy Championship Sunday! Even though my beloved Atlanta Falcons are not in the playoffs, I still love a good football..even in my classroom! I was lucky enough to get to visit the Ron Clark Academy in May, and I was inspired to recreate this fun football-theme activity after listening to some of the amazing things Kim Bearden has done in her classroom. I thought I would share it as part of a blog hop and giveaway with some fellow Colorado teachers to celebrate the Broncos' big win! 


Here's how we play:

First, use painter's tape to outline a field. (Masking tape is hard to pull up. Trust me. Thank goodness I had 26 little helpers to get it all up for me!) My classroom was pretty big last year, but I still plan on doing it in my new room this year. I didn't do an "entire" field, and the kids didn't notice!


Then, I borrowed some jerseys from our PE teachers to divide my kids into 2 teams. Each team was then split into pairs. I strategically paired my students. They also had a whiteboard to share with their buddy. 


The teams each started in their own "end zone". I used this as a science review, so I could ask random questions about what we were studying at the time. They could only discuss it with their partners. Teams were not allowed to share answers. On my cue, they would reveal their answers. Here's how it went from there:
  • If they were correct, they moved to the next yard line. 
  • If they were incorrect, they stayed where they were. 
  • Any illegal contact (sharing with other teammates) resulted in a penalty, and they had to move back a yard line.

Once a set of partners had moved enough yard lines to score a touchdown, they would earn 6 points for their team. Then, the partners that scored went for an "extra point". I would ask a bonus question only they could answer. If they answered correctly, their team scored an extra point!


Now, here is where you can adjust the game as you see fit. Usually, everyone stayed where they were and the game continued. The pair that just scored simply went the other direction. Another option would be to move everyone back to their endzone and "kick-off" again. 

My kiddos loved this game last year, and I can't wait to try it again this year. One of the great things about this activity is that you can use it for every content area!

Want to see another great football-themed activity? Then head over to Lopez Land Learners by clicking on her button below. But...don't forget to enter the GIVEAWAY first!

Lopez Land Learners

a Rafflecopter giveaway


Check back at 6:30pm MST for the Bronco Giveaway!!!

I'm linking up with Colorado bloggers tonight to celebrate the big win! Come back at 6:30pm MST tonight!!!


21 January 2016

Five for Friday!

Happy Friday! I am linking up again with Doodle Bugs Teaching for Five for Friday. It's always a great way to reflect on my week in the classroom.

Let's get it started!


After watching a scope with Hope King using giant Jenga, I was inspired to make it possible in my classroom. I found 6 sets at Walmart for only $7 each, so I took the plunge. My boys and I colored the ends with Mr. Sketch markers, which was pretty easy. The game we played was rather simple, and I can think of many ways to adapt it for different content. I'm going to do a separate blog post about it later (when I have time!), but in the meantime, you can check out my Periscope below on how we used it in math. The kids LOVED it!

You can find the FREE answer sheets that I used HERE.


When we started using our new curriculum, I realized we were spending way to much time opening our desks and digging through them for supplies. (We have open-top desks.) So, I created supplies labels that I stick on the board each morning letting my students know which supplies they need to have out on their desks before we go to specials. That way, when we return, everyone is ready to learn because everything they need is sitting on their desks waiting for them. They have been SUCH a life-saver! While I have labels for lots of supplies, sometimes I don't have the specific label, and I just write it on the board next to the supplies. There is no question about what they need anymore. Love it!

You can check them out in my store by clicking HERE or on the picture below. There is a yellow set, red set, and black set. Twenty supply labels are included.


We've been learning all about winter and animal adaptations, and the kids wrote some fantastic paragraphs using their new knowledge. I thought it would be fun to have some nice paper to write their final copies on. The adorable snowman is from Creative Clips Snow Buddy set. Isn't it the cutest? You can download a free copy of the paper by clicking HERE


My students had to take an online district assessment at the beginning of the year, and it was a massive disaster. They had so much trouble typing and several ended up in tears. After that, I found a fun app they could use on our iPads to help with their keyboarding. It's called Typing Jr. and I'm pretty sure it was a free app. Words come out on little fish, and you have to type the word out before the shark reaches the fish. My kids love it. You can choose form 3 different levels. It's definitely worth checking out.


My very first year of teaching I bought these magnetic dry-erase sentence strips from Lakeshore. I definitely did not get my money out of them until this school year...6 years later! I've used them as empty number lines, for sequencing details, phonics chains, arrow method addition, and more! Today I used them to prewrite the suffix rules we had been learning about. That way, when the kids remembered the rule, I could quickly post it without having to stop and write. It's a great time saver.

Well...those were a few highlights from my week. I can't wait to see what next week holds for us! If you want to join the link-up, head over to Doodle Bugs Teaching by clcking on the button below!


Blessings!


17 January 2016

Five for Friday

I've bene neglecting the little blog lately, so I decided I would link up with Doodle Bugs Teaching for Five for Friday! You can link up too by clicking on the button below.


Here was my short week...


We've been using these place value mats I made to help with our addition and subtraction. The kids love them because they get to use Expo markers. I love them because they are reusable thanks to the plastic sleeves I picked up at the Dollar Tree before school started. I wasn't able to get an entire class set, so the other kids just use a regular document protector, which works just as good. I found some page protectors like these on Amazon. You can check them out HERE. It's a set of 25 for $31.88, which is a great price!

I have no idea what I saved that file under for the place value mat, but I will put it here to download as soon as I find it!


I wanted to have some of my kids start taking home fluency strips and passages to practice reading at home. I needed a central location for them to store everything so it wouldn't get lost and would be easy for parents to get to. While I was visiting my family in Texas over Thanksgiving, I noticed that my niece's kindergarten teacher had made pencil pouches using gallon sized bags. She reinforced the bottom where she punched holes, and then she clipped them in the binders. Genius! 

 *The fluency strips are from Jane Loretz from See Jane Teach Multiage. My kids LOVE them. It helps that they're Star Wars themed. The kids progress through different levels that involve the characters. You can check them out HERE


The passages are from Christina Decarbo. I like them because they help my kids practice their sight words, but they are reading them in text which is so much better! You can check them out by clicking HERE.


Let me start by saying that I absolutely LOVE Amy Lemons' and Katie King's new Rooted in Reading series. I have a comprehension group for 40 minutes in the afternoon, and these activities have been so great for them. I haven't been using the grammar pieces as much, but we have plenty of engaging activities to do with just the comprehension pieces. So...I wanted to make an anchor chart for the MLK Jr. week. While I can make a pretty decent anchor chart, I really liked the one Amy made and shared in the set. I blew it up using my projector, slapped my chart paper on the board, and TRACED it. Now I have a beautiful anchor chart to go along with our lesson. Not only am I using the great materials they created, I can also use the same eye-catching anchor charts! (Oh! Go check out Amy and Katie's newest Rooted in Reading set for February by clicking on the picture below!)


My last classroom was really big. So I had to be creative in my new classroom because I wanted all the same components of my old classroom. My meeting area is super important, and I knew I had to make it work. It's been fine for the most part, but recently, I've noticed I have to start every group meeting with "Scoot up! Fill those gaps! That's not an acceptable place to sit. If I can't see you, you can't see me! Are you sitting by a successful buddy?" It's driving me nuts! So, after stalking Chris from Famous in First's giveaways for Sit Spots, I finally gave in and bought some for my room. They seem random colors (trust me, it's killing me on the inside!), but they match stickers on their desks. Each pod (4 desks) has 4 colors (pink, green, yellow, and white) that the kids are strategically placed at. My thinking is that they will still have to sit on their assigned colors. I might make them sit by their current elbow buddies, but we'll see how it goes. The ultimate goal is to get seated quicker and start our lesson.Go check Sit Spots out by clicking HERE.


I've said this before, but I love our CKLA domain studies. We just started Cycles of Nature, and the kids are already loving it. The curriculum called for us to complete a seasons chart as we read one of the listening pieces. But I am really big on engagement, so I thought it would be more fun to take all the chart details and divide them up among my 6 pods and have them work together to determine where they went on the chart. Each table took a turn coming up, and as they stuck their cards up, the other tables discussed whether they were correct or not. The best part was when they had to move other misplaced cards because they had to determine where that it was supposed to go. It was pretty quick and was way better than me standing up there and writing them all out.


And of course, a new domain wouldn't be complete without me dressing up for it! 

I hope you're having a great long weekend! Stay safe and talk to you all again soon!